It is possible to copy a row based on a cell value while working with Microsoft Excel spreadsheets. Doing this saves you time that you would have otherwise spent scrolling through different worksheets looking for information.
The article below will show you different methods you can copy a row based on a cell value. Please read on to find out.
Method 1: copy rows if a column contains a specific value with the Filter command in Excel.
In this method, you will find out the cell (s) that contains the specific value in a specified column using the Filter command. Copy the filtered row in Excel. Here is what to do;
1. In an open excel workbook, select the column that you will filter.

2. On the main menu ribbon, click on the Data tab.

3. Under the Sort & Filter group, click on the 'Filter' option.
4. A drop-down arrow will be displayed on the right side of the selected column's first cell. Click on the arrow and select Number Filters to display a popup menu list.

5. In the list, select Custom Filter to display a dialog box.
6. Under the different fields provided, fill in your preferences and click OK in the open dialog box.
7. Please select all the filtered-out rows and copy them.
8. Select a blank row or cell, and paste the filtered row.
Method 2: copy an entire row to another sheet based on cell value with VBA code.
1. Press the Alt + F11 keys simultaneously to open the Microsoft Visual Basic for Applications editor window. You can open this window by going to the Developers tab in your worksheet and clicking on the Visual Basic option.
2. In the VBA window, click on the Insert tab and select Module.
3. In the code window, copy and paste your macro code. It is the code that will enable you to copy and move the row. The code must contain the row you want to move, the destination worksheet you wish to locate the row, the column with a certain value, and the exact value you will move.
Sheets("sheet1").Range("C:E").Copy Sheets("sheet2").Range("G:I")
Replace the cell values to match with rows you want to copy
4. Press the F5 key to run your macro code. The row will be copied and moved to sheet 2.
Method 3: Combining IFERROR & VLOOKUP Functions to Copy Rows Automatically to Another Sheet in Excel
IFFEROR & VLOOKUP Functions are the simplest methods, you can use to copy rows in Excel. In this combination, the IFERROR function corrects errors if case the formula has errors and returns a specific value. On the other hand, the VLOOKUP (Vertical Lookup) function ensures that Excel checks for a specific value in a column and returns a value from another column in the same row.
Steps:
1. Firstly, create another worksheet IFERROR &VLOOKUP(2) where you will paste your data.
2. In the new worksheet, select a cell to write the following formula. You can choose cell B4.
=IFERROR(VLOOKUP('IFERROR &VLOOKUP'!$B$4:$B$1000, 'IFERROR &VLOOKUP'!$B$4:$D$1000, 1, FALSE), "")

3. Tap the Enter button, where the formula will copy all the values of column B from the initial sheet (IFERROR & VLOOKUP) to the new sheet (IFERROR &VLOOKUP(2)) but in the same column.

4. Proceed to write the following formulas in cells C4 and D4 of sheet IFFEROR &VLOOKUP(2)
Cell C4;
=IFERROR(VLOOKUP('IFERROR &VLOOKUP'!$B$4:$B$1000, 'IFERROR &VLOOKUP'!$B$4:$D$1000, 2, FALSE), "")

Cell D4;
=IFERROR(VLOOKUP('IFERROR &VLOOKUP'!$B$4:$B$1000, 'IFERROR &VLOOKUP'!$B$4:$D$1000, 3, FALSE), "")
5. Once you press the Enter button, the formulas will give a new dataset in the new worksheet.

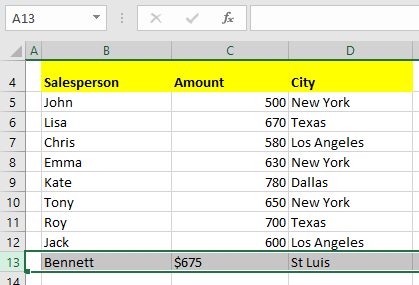
6. Go back to the initial worksheet and add your preferred new row of data.
7. Now back to the new sheet, you will note that the row you added in the initial worksheet appears the same as the one in the new sheet. This happens in the followings ways:
- VLOOKUP(‘IFERROR &VLOOKUP’!$B$4:$B$1000,’IFERROR &VLOOKUP’!$B$4$D$1000,1, FALSE),””) extracts the values of the first column of the initial worksheet (IFERROR &VLOOKUP).
- IFERROR(VLOOKUP(‘IFERROR &VLOOKUP’!$B$4:$B$1000,’IFERROR &VLOOKUP’!$B$4:$D$1000,1, FALSE,””) returns blank if any VLOOKUP value in the range ($B$4:$D$1000) gives an error.
Method 4: Inserting A Table Query Window to Copy Rows Automatically in Excel to Another Sheet
1. First, you need to highlight the whole table range. For example, you can select cell range (B4:D10).

2. Click on the Table Design tab and choose Properties. Next, you can rename your new table as New Table.
3. Click on the Data tab on the ribbon and select From Table/Range option. The step opens a new window with query settings.

4. In the new window, click on the Add Column tab where a menu will appear. Go to the Index Column and select the From 1 option.

5. After that, you will see a new index column with all the data from your previous data range.
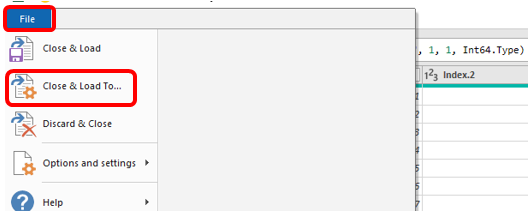
6. Go to the File section and tap Close & Load To where you will see a dialogue box. Look for a New worksheet option in the box to store your data. You can also tick Add this data to the Data Model checkbox.
7. Click the OK button and the action will return a new table in a new worksheet. The new worksheet's name should also be the same as the table's name.

8. You can now go back to the initial worksheet and insert a new row in the dataset.
9. Onto your new worksheet New Table, right-click on the name of the worksheet, go to the Queries & Settings and tap Refresh.

10. Finally, you notice that after placing a new row in the initial worksheet, the new worksheet will show the same row automatically.
Method 5: Automatically Copy Rows To Another Sheet and Remove from Source Data in Excel
In this method, you only deal with the copying of rows from a range of data.
Steps;
1. Highlight all the datasets provided.
For example (A1:C7).
2. Right-click on the worksheet name i.e., VBA2 and tap the View Code
3. You will note a new VBA appears.
4. Place the code below in the empty window.
Sub copy_rows()
For Each cell In Selection.Columns(3).Cells
If cell.Value = "New York" Then
cell.EntireRow.Copy Worksheets("VBA2Copy").Range("A" & Rows.Count).End(3)(2)
cell.EntireRow.Delete
End If
Next
End Sub

5. Tap the Run option in the ribbon to run the code.

6. After that all the code will copy the rows from your initial worksheet (“VBA2”) to the new worksheet (“VBA2Copy”).
7. You will see the step above will remove the rows from “VBA2” but the new worksheet will contain all the rows.

Conclusion
The article above has given out different ways of copying a row based on a cell value in excel. I hope you find it informative and helpful.