
If you are working on a document that requires regular changes by others, you need to enable the Tracking changes tool in your document. A track change feature in excel helps record all changes in Excel. The track change feature allows one to give authority and permission to others who want to use the document. This feature also allows other people to review, change or share the ownership of the file. In this post, we shall discuss all the workaround related to Track Changes in Excel.
To Enable Track Changes in Excel
You need to enable the Track Changes Tool in your Workbook to get started. Below are the steps to enable this tool:
1. Open the Excel application.
2. Open the Workbook that you want to add the tracking feature.
3. Click the Review Tab on the Ribbon, and then go to Track changes found under the changes section.
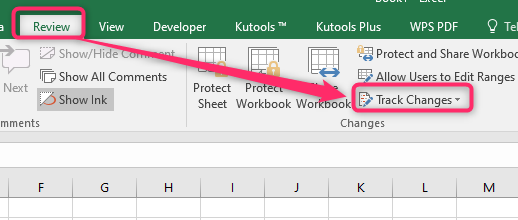
4. Click the Track changes drop-down and select the Highlight Changes button.

5. Check the “Track changes option while editing” checkbox.
6. Select the criterion for viewing changes made on the file, such as All, Everyone, etc. Note that this option limits one to filter changes by dates but is not yet reviewed.
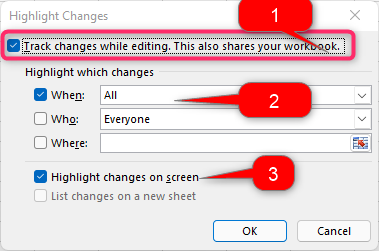
7. Select a choice between tracking changes in the entire Sheet or some parts of the Sheet. Finally, check the “Highlight changes on screen” checkbox and click the OK Button to save changes.
To use the Track changes tool
How to view changes made to a worksheet
After enabling the Track changes tool, here are steps to follow to view changes made to the Worksheet.
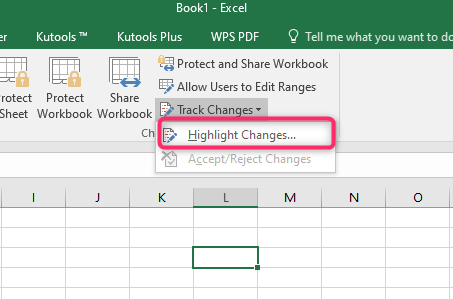
1. Click the Review Tab on the Ribbon, and then go to Track changes found under the changes section.

2. Click the Track changes drop-down and select the Highlight Changes button.
3. Check the “List changes on a new sheet” in the Highlight Changes dialogue box. Then, click the OK Button.

4. A new History Sheet will be created in the toolbar. Click the History sheet, and view all the changes made in the Worksheet.

Accepting/Rejecting Changes
After changes are made to the Excel document, the user has the opportunity to accept or reject them. Here are the steps to follow while accepting or rejecting changes made to a document.
1. Click the Review Tab on the Ribbon, and then go to Track changes found under the changes section.

2. Click the Track changes drop-down and select the Accept/Reject Changes button.

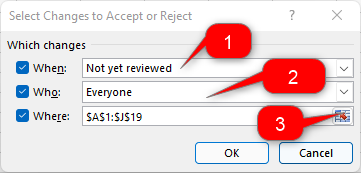
3. A Select Changes to be Accepted or Rejected dialogue box will open. The dialogue box has three sections:
When section: In the When section, select all the changes that have not been reviewed (Specify the date).
Who section: Under this section, select whose changes you want to review.
Where Section: This section allows the user to select the range of cells you want to review.
4. Click the OK Button to open the Accept or Reject Changes dialogue box.
5. In the Accept or Reject changes dialogue box, you can accept all changes by clicking Accept All changes or accepting changes. Alternatively, you can reject all changes by clicking the Reject All changes or rejecting changes one by one.
