

You have several Excel files that make it harder for you to access data. You keep switching between different opened files, and this process takes a lot of your time. You are well aware that it is a lot easier to process data in a single file instead of switching between numerous sources. Then comes the question, how can I merge all these files into one comprehensive file? It is a troublesome and long process trying to combine different Excel files into one file when you factor in the number of worksheets found in one workbook. There are various ways of merging Excel files.
In this article, we discuss how to merge multiple Excel files into one file. Let's get started.
Method 1: Combine multiple workbooks into one workbook with the Move or Copy function
1. If you want to merge all the existing files into a new Excel workbook, create the new Excel workbook and open it. But if you're going to combine all of them into a current workbook, open that workbook.

2. Open all the Excel files you want to merge. You need to open all files to be able to combine them into one. Instead of doing it manually, select all the files and press the enter key on your keyboard. To select multiple files that are non-adjacent, hold the Ctrl key and click the files one by one. For adjacent files, hold the Shift key and click on the last file to select them all.

3. Maximize the first file you want to merge.
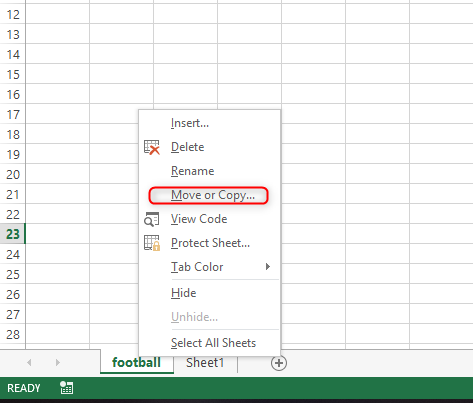
4. Right-click the worksheet you want to merge, then select Move or Copy.
5. On the pop-up window, click 'Pick from Drop-down List.' All the Excel files opened on your computer will be displayed here

6. Select the excel file you want to merge other files into in the 'To book' drop-down arrow.

7. To merge excel files, check the Create a copy checkbox.
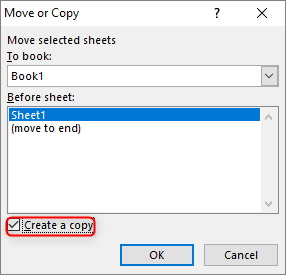
8. In the Before Sheet section, select 'move to end and click OK. It will create a copy of the worksheet in the destination file.

9. Repeat all the above steps for all the remaining files and save your file.
Method 2: Combine multiple workbooks into one with VBA
1. Open a new workbook that will act as a master workbook.

2. Press Alt + F11 to the VBA page

3. Click on the Insert tab. Next, select the Module tab.

4. Copy and paste the macro code below.
Sub GetSheets()'Updated by Extendoffice 2019/2/20Path = "C:\Users\dt\Desktop\dt kte\"Filename = Dir(Path & "*.xlsx") Do While Filename <> "" Workbooks.Open Filename:=Path & Filename, ReadOnly:=True For Each Sheet In ActiveWorkbook.Sheets Sheet.Copy After:=ThisWorkbook.Sheets(1) Next Sheet Workbooks(Filename).Close Filename = Dir() LoopEnd Sub
5. After this, it is time to initiate the command by pressing F5 to run the excel macro code. Doing this will open a file and then copy the data. It will paste the same in your new workbook. Close the workbook.

Method 3: Merging Microsoft Excel files as CSV files.
1. Open the excel files.
2. Go to the Menu bar. Click File. Then Save As.
4. In the Save as type, there is a drop-down list. Select CSV from the list.

5. Do this for all the files you want to merge, and then place all the CSV files into one folder.

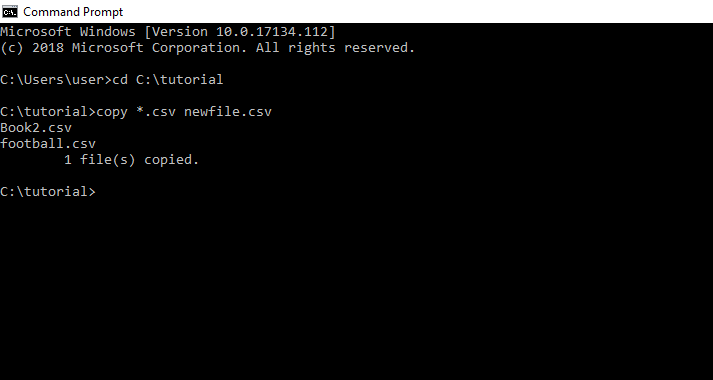
6. Open the command prompt then navigate to your folder. Type the following command to merge all CSV files in the folder into a new CSV file. Copy *.csv newfile.CSV
7. After creating the new file, open the new CSV file in Microsoft Excel.
8. Save it as an Excel file.

Method 4: Using Power Query
The Power Query method is the best way to merge data since you only need to store all the excel files in a single folder. You can then use that folder to load data from files into the Power Query Editor. It also allows you to transform data while combining.
However, for the Power Query editor to merge Excel files, you need to understand that all data should be structured in the same way. That means the number of columns and their order should be the same. Below are steps to follow when merging files with the Power Query application.
Power query allows to import, edit and consolidate the data. It can also be used to import and combine multiple excel files into one folder.
With the Same Name of Worksheets and Tables
1. Move all the files into the new folder that you want to combine.

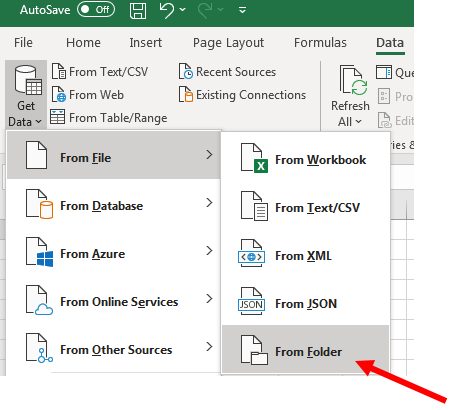
2. In Excel go to the Data tab

3. Press Get Dat > From File > From Folder
4. Browse and select the folder path
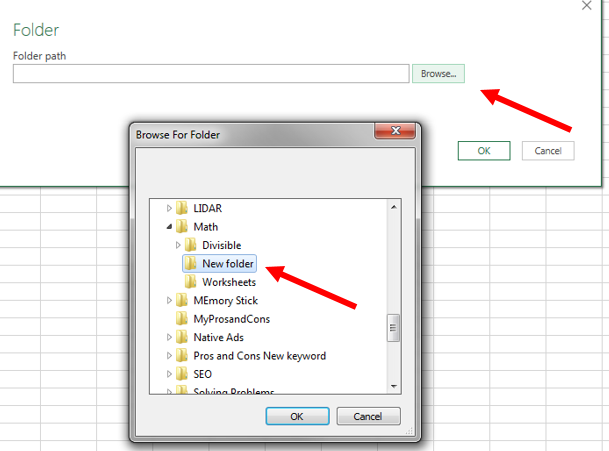
5. Press Ok
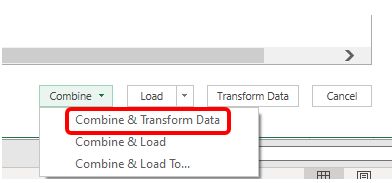
6. If files are ready to combine press Combine & Load

7. If you want to manipulate the data, then press the Transform Data button. This will open the query editor where you can work on the data.
From here, select the table in which you have data in all the workbooks. A preview of this will appear at the side of the window.

8. Once you select the table, click OK to merge data from all the files into your Power Query editor. You will see a new column with the name of the workbooks from which data is extracted.

9. Right-click on the column header and select “Replace Values”.

10. Enter the text “.xlsx” in the Replace Values box and leave the “Replace With” box blank. The idea here is to remove the file extension from the name of the workbook.

11. Next, double-click on the header and select “Rename” to enter a name for the column.

12. At this point, your merged data is ready and you only need to load it into your new workbook. To perform this, go to the Home Tab and click on Close & Load. Now you will have your combined data from all tables or workbooks with the same name in a single workbook.

Note: You will not have the same table name in all the excel files all the time. At that point, you can use the worksheet name to combine data with the Power Query method. However, you should note two points when using the worksheet name to combine data with the power query method:
- Power Query is case-sensitive. So, you should have the same letter names of worksheets in all the workbooks.
- You should have the same name for the column headers, but the order of the columns does not matter. If column1 in the north.xlxs is column2 in the west.xlxs, Power Query will match it, but you need to have the same column names.
Therefore, when combining files using the power query, you can use the worksheet name instead of the table name. You only need to select the worksheet name, click on the Combine & Edit, and follow all the steps outlined above from step number 6.
When You Don’t Have the Same Name of Worksheets and Tables.
In some situations, you can lack the same name of worksheets and tables in the excel files. In this case, you must know how to combine data from these different worksheets and tables into one file, following these steps:
1. Open the “From Folder” dialog box to locate the folder where you have all the files and click OK.

2. After that, click on the “Edit” to edit the table.
3. Once the table and Power Query editor open, select the first two columns of the table and click on the Remove other Columns from the right-click menu.

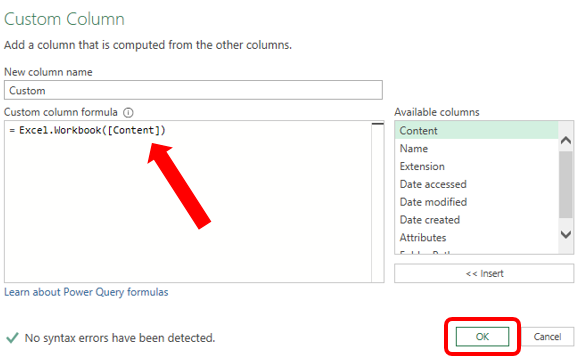
4. From here, you need to add a custom column to fetch data from the worksheets of the workbooks. To do this, go to Add Column Tab and click on the Custom Column button. The step will automatically open the Custom Column in the dialog box.

5. In the dialog box enter the formula below and click OK.
=Excel.Workbook([Content])
6. You will have a new column in the table from which you need to extract data. Open the filter from that newly added custom column and click OK to expand all the data into the table.
7. You will see a newly expanded table with some new columns. Delete all columns from the new table except the third and the fourth column.

8. Now open the filter for the Custom Data column to expand it and click OK.

Once you click OK, you will get all the data from the files having been merged into a single table. Though, if you notice all the headings of the columns are in the data itself, you need to add the column headings as follows;
- Double-click on the header and add a name. You can also right-click and select Rename It.
- Exclude the headings you have in the data table. For this, open any column’s filter options and unselect the heading name which you have in the column data and click OK after that. After you click ok, your data is ready to load into the worksheet.
- Go to the Home Tab and click on Close and Load. This allows you to combine data from different workbooks that had different worksheets names.

At this point, you have already merged the data into one single file. You should then apply some formatting to avoid losing a single file of your data when updating it. To format a single file, you can use these steps:
- Go to Design Tab and open Properties.
- Untick the Adjust Column width and tick the Preserve Cell Formatting
Conclusion
The above tips help you to be organized and save time. Whether you decide to merge data in excel into a single file, or if you prefer to spread your work across multiple files, either of the methods above will help you. Excel offers immense features such as an in-built tracking feature that keeps track of any changes made in your files. So, losing your original data should not be a cause of dilemma.